Category Archives: Miniatures

Soviet vs. West German Playtest

Soviets begin their assault

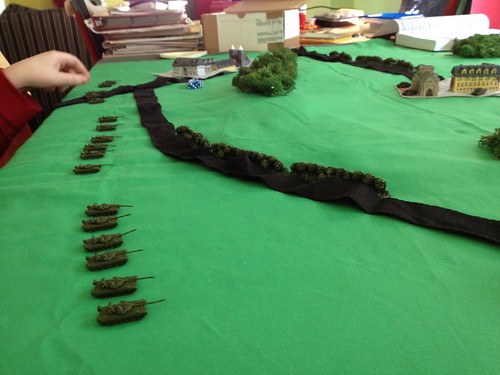
Many months ago I ran a game with my son to test Fistful of TOWs 3.  The game was of a Soviet T80 tank regiment assault on two companies of West German Leopard 1A4s. My son played the Soviets and I played the West Germans. 

The Soviets attempted to flank the Germans from both sides and ended up destroying the German defenders, though at a loss of nearly half the regiment.  In retrospect, the center battalion should have held off its attack until North and South battalions commenced their attack.  Amazingly, the last stand of the center tank battalion managed to survive its morale check.  I put up a slide show of the game.

In addition to this game, I ran another game that I will post about later.  I haven't had much time to game, though I painted my LeClercs and YPR-765s.

Building IanH’s 6mm Cognac paper houses

I finally photographed the two IanH's 6mm Cognac paper houses I built awhile ago.

I printed the house, cut out reinforcements for the walls using thin styrene sheets, then glued the paper to the styrene sheets using rubber cement. After I put it together, I used styrene square tubes in each corner to reinforce it. See the next picture.

For the roof, I reinforced it using two really thin styrene sheets on either side of the roof, then glued it to the tabs I left from the paper around the walls. I am not satisfied with how the roof went on and need to glue them better in the future.

Looking at one of the houses from the bottom. You can see the thin styrene sheets I used to reinforce the walls and roof. After I put it together, I reinforce it by gluing styrene square tubes to the styrene sheet walls in each corner with Krazy Glue. The tubes were a pain to cut with a scissors, so next time I plan to use an L brace instead.

IanH's paper models are free and fantastic.  The only complaint I had was with the model on the left.  It looks to me like the sides were swapped and if you built it by cutting out in one piece, then the ivy on one wall wouldn't match the next one around the corner.  To get it to look right, I had to cut each wall separately and then glue them together in the order I thought they should be in.

On the first day of Christmas

For Christmas, my wife was kind enough to get me a set of C-in-C miniatures, including my first World War 2 miniatures:

  • 10 Soviet T-34D tanks
  • 3 Soviet KV-1 tanks
  • 5 German Panzer 3m tanks
  • 5 German Panzer 4g tanks
  • 3 German Stug IIIg self-propelled gun
  • 4 Dutch Lynx Recon vehicles
  • 4 German Leopard 2A5 (Improved) tanks

As always, the quality and detail of them was astounding.  They proved to be quite clean and had little flashing.  After cleaning them, I primed them with a gray spray primer.  For the Soviet vehicles, I then sprayed them with Tamiya Olive Drab (TS-5).  I fear that they are too dark and the fact that it was 43 degrees out today probably didn't help.  A bit of dry brushing with a lighter olive drab will hopefully help.  

I look forward to trying them with Fistful of TOWs 3 or Kampfgruppe Commander at some point.

Half way there … again

My miniatures seem to be always half done, i.e. primed or with a base coat, but no camoflage or detailing. Unfortunately, my recent activities haven't been helping with that issue.  I recently primed/sprayed a base coat on the following miniatures:

2 F-104 Starfighters (Viking Forge, I think)
2 A-7 Crusader IIs (Viking Forge)
2 F-4 Phantoms (Collectair)
2 Mig-29 Fulcrums (Luftwaffe)
2 Lynx helicopters (GHQ)
1 A-10 Thunderbolt II (C-in-C rebuild, amazing what crazy glue and spray paint will do)
6 Soviet 160mm mortars (Viking Forge)
5 TPZ Fuchs (C-in-C)
5 M105 Deuce Bulldozers (GHQ)

On the plus side, I was able to build two very cool paper buildings.  More on those and other buildings I am working on later.

Priming and base coats done for a bunch of 1/285th scale miniatures

I finally got around to spray priming/basecoating a bunch of my 1/285th scale Cold War-era miniatures including:

15 Dutch YPR-765 (GHQ)
5 Dutch YPR-765 TOW (GHQ)
6 NATO M106 SP mortars (GHQ)
2 Soviet 2S6 AA (PFC C-in-C)
18 AMX-30 (PFC C-in-C)
11 Chieftains (GHQ)
10 Warrior IFVs (GHQ)
3 Central European apartment buildings (? resin manufacturer)

The British vehicles had already been painted various non-standard paint schemes, so I simply sprayed them with Tamiya Olive Drab 2. The Chieftains and half the Warriors haven't been touched in about 26 years.

The other NATO vehicles were primed in a light gray, then sprayed with Tamiya NATO Green. The 2S6s were primed as the NATO vehicles, then sprayed with Tamiya Olive Drab 2.

The buildings were simply sprayed black. I am getting tired of monopoly houses as my principal residential structures, so I may concentrate on my backlog of buildings before everything else.

Update

I ran a playtest of the star ship rules I have been working on.  It was a faceoff between a Battlestar Galactica fleet and a mixed Earth/ISA/Deisho fleet.  I will post pictures and an update to the rules, now to be called Star Bright, soon.

Additionally, I found a pretty decent sent of free ancient naval rules called Fleet of Battle at Wargames Illustrated.  It uses a card based command/control system that factors in the quality of the crew and commander.  Looks like my triremes moved up on the painting priority list.

Finished Deisho Fleet

photo

I finally finished the Deisho fleet I have been working on for a while.  I created a slide show.  The fleet consists of:

  • 3 Do"Ming"Tao Class Frigates
  • 3 Yen'Ming'Tao Class Frigates
  • 2 Shi'Dong'Tao Class Destroyers
  • 2 Jin'Dong'Tao Class Destroyers
  • 2 Ro'Dong'Tao Class Destroyers
  • 1 Jimg'Gung'Tao class Heavy Cruiser
  • 1 Bao'Gung'Tao Class Heavy Cruiser
  • 1 Yao'Jing'Tao Class Strike Carrier

Unfortunately, the mount hole of one of the destroyers proved to be too small, so I will need to redrill that one. 

Here are the painting notes:

  1. after building them, I spray primed them with a gray primer;
  2. applied a darker gray to them.  See this note;
  3. applied a red mixture to different parts of the ship;
  4. applied my standard Floquil silver wash to the red parts to give them a different look;
  5. painted the gun barrels, missile launchers and hanger with Model Master Gun Metal;
  6. finally painted the inside of the engines in Floquil USSR Underside Blue.

Pictures were taken with the macro feature in direct sunlight, though the picture of the entire fleet might have had the flash on unfortunately.

I have a bunch of other Deisho ships, but those will have to wait their turn in the queue.